This is part 2 of yurt deconstruction with commentary. We'll start right out with an out of order photo.
1.
 |
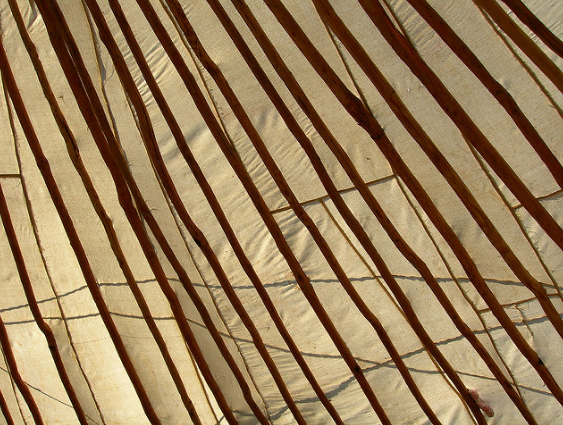
| Here's an inside shot of the roof with the felt removed but the canvas still in place. Note the pieced together construction of the canvas cover. The long transverse lines are not seams but shadows of tiedown ropes. Also note the irregular nature of the rafters. They are probably made from willow branches with the bark peeled off. |
2.
 |
| So now all the coverings are off the yurt and the frame is standing naked. Note the height of the wall and the door. You have to duck to get inside. But as will be apparent from a later shot, furniture and assorted stuff gets lined up along the wall so that even though you can't stand up straight in the yurt right next to the wall you don't have to because you will be farther toward the center on account of the furniture. Also note that the rafters are curved at the bottom giving the roof just a little more elevation. So why don't they just make the walls taller so you can stand up in the yurt right next to the wall and also don't have to duck when you go in the door? Two reasons. One is that a lower volume yurt is easier to heat. The other is that the walls would be heavier and the wall lattices would be longer and harder to transport. |
3.
 |
| A closeup of how the rafter poles are tied to the top of the door frame. To the extreme left, you can see one of the wooden knobs on the top of the frame that the rafters are tied to. Elsewhere the rafters are tied to the top of the wall lattice. |
4.
 |
| The tono, the ring into which all the rafters are mortised is supported by two wooden supports. The wooden supports have a dual purpose. One is that without supports, the weight of the rafters and the tono combined would exert much more outward pressure on the top of the wall lattice and tend to push it outward. The second purpose of the tono supports will become apparent in the next picture. |
5.
 |
| Setting the tono up or taking it down would require a ladder or some tall furniture to stand on if it weren't for the supports. Here, all but three rafter poles have been removed. Two people are holding on to the supports while others are pulling the last of the rafter poles. |
6.
 |
| With all the rafter poles gone these two guys can lower the tono to the ground. |
7.
 |
| Once on the ground, the supports are untied from the tono. Here you can also see the square mortises that the tips of the rafter poles go into. The ends of the rafter poles are also square to prevent the poles from twisting. Remember that the lower ends of the rafter poles are bent downward and the square mortises keep them aligned in that position. |
8.
 |
| Here's the tono all by itself. Rafter poles are lying on the ground. The tono looks to be about 5 feet in diameter. The tono circumference needs to be large enough to accommodate all the rafter poles with enough clearance between mortises. |
9.
 |
| View of the yurt interior with all the furnishings and household goods still inside. |
10.
 |
| The wall lattice comes in sections to keep size and weight down to manageable dimensions. |
11.
 |
| Here's a section of wall lattice small enough for one person to handle. Note the curvature of the lattice poles. They are bent that way before the individual lattice poles are assembled. They are curved because the wall is curved. The curvature at the bottom section of the poles is inward and at the top section, slightly outward. A tension rope is run around the entire outside of the wall lattice at the point where the curvature of the wall goes from inward to outward. |
12.
 |
| Sections of wall lattice are overlapped at their edges and lashed together. The number of intersections of lattice poles at the top of the lattice have to match the number of mortises in the tono since one rafter pole is attached to each lattice intersection and each rafter has to have a mortise of its own. |
13.
 |
| A wall section collapsed. Where poles intersect they are joined with a piece of rawhide. |
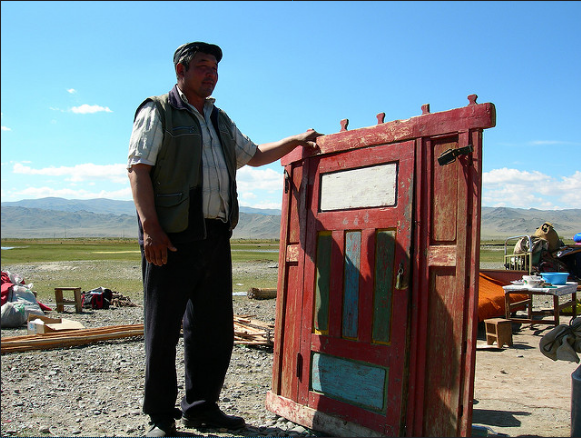
14.
 |
| The door and its door frame all in one piece. You can see how an adult has to duck to enter the yurt. Also plainly visible are the knobs on the top of the door frame to which the rafter poles are lashed. |
All the stuff in the background needs to go on the truck along with the frame components and the coverings. Before there were trucks, all this stuff would have gone on the backs of yaks or other beasts of burden.


No comments:
Post a Comment